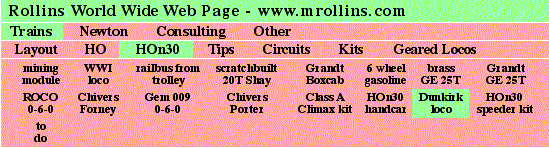
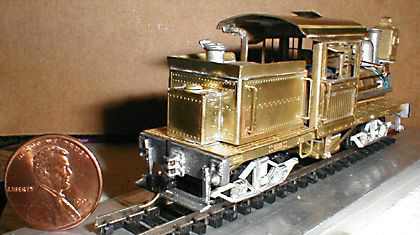
HOn30 Class B Dunkirk Project
A Life-Line N-scale GP-35 (?) provides the motive power.
I did not have a unit with a flywheel, so I installed one made
of lead. Information on detailing the model came from the book
"The Geared Locomotives of Dunkirk" by David Hoffman.
The disk-shaped copper object is a US penny (7.5 mm diameter).
This locomotive is based on a Brick Price etched brass kit. It's a great kit, and can be used (depending on your skill and level of masochism) to build a Climax, Heisler, Shay or Dunkirk. It even has a cutaway cab side if you're building a Shay. Information on the kit, as well as for orders by check or money order, look at Brick's web page. For credit card orders, the kits can be found at B & F Hobby Shop, CA (west coast USA), or Train & Trooper, ME (east coast USA).
Dunkirk Construction Details & Hints
Shown below are some photos that illustrate the construction behind this model. The directions with the kit are a bit plain, and do not have a lot of detail, especially about how to detail a Dunkirk. Note the importance of the bottom photo - this shows how to turn a Keystone Locomotive Works smaller Shay truck sideframe into a passable Dunkirk sideframe. Note that the headlight is not crooked, that's an artifact of the close-up photos.
The sand and steam dome, water tank hatch, smokestack, as well as 2 of the sideframes (modified for this loco, see below) come as part of the Keystone Locomotive Works "Logging Junk" parts package (Walthers catalog # 395-14). The headlight is a Precision Scale item, I don't know the part number. The front and rear pilots are Keystone Locomotive Works also (Walthers catalog # 395-10). A cover was added for the sand dome and rear sandbox.
Unique to a Dunkirk, the two different diameter pipes on the side of the boiler are symmetrical for each side of the locomotive. A Dunkirk is not like a Shay, there is no "good side". The larger one is aluminum tubing, the smaller one is brass rod.
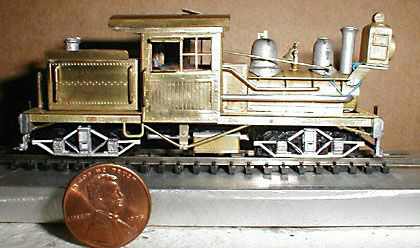
I found it difficult to get the proper convex shape for the boiler front, which is made in two pieces. I settled on using a tiny bit of super glue to stick them together. Then I put them detail side down on a smooth piece of soft pine. I then put a large (2.25 inch plus) smooth trailer hitch ball on top, centering it. I carefully but firmly BEAT THE CRAP out of the trailer hitch ball - the force is transmitted downward, pushing the brass into the yielding pine; the force of the pine pushing back caused the brass to conform to the trailer hitch ball. Net result - a nicely dished smokebox front.
There are some extra boiler sections in the kit. I used one to make the headlight bracket. I then glued a piece of styrene for the lamp to sit on. The blue wires (also used for sand pipes) will be hidden by paint and some detail junk. The light does work.
Another of the extra boiler wrappings was cut in half lengthwise. These were bent into "C" shaped parts, glued to a square of styrene. This became the firebox below the cab in the first photo. To the front and back of the firebox is glued a short piece of aluminum tubing. This simulates the Dunkirk's drive system - be sure it doesn't catch the trucks when they pivot.
Additional detail included the handrails, and the pin for the link & pin coupler. This is just insulation from larger wire sliped over a piece of brass rod. The smaller truss rods at each end were glued in place. A small Grant Line nut-bolt-washer casting was glued onto the pilot below the poling pocket.
Unique to a Dunkirk, the large side truss rod and bracket is easy to make. I took some leftovers from the etched brass, and cut these into a strip. These were bent around the rod to be used for the truss rod brace. If you want to be a stickler for detail, these truss rod braces taper slightly top to bottom. I added some Grant Line nut-bolt-washer castings to the brace and to each side of the frame near where the truss rod would have ended.
Unique to a Dunkirk, the builder's plate is a rectangle with notched corners, essentially an elongated octagon. I cut these out of thin styrene, and glued them over the etched-in "BP" (Brick Price - sorry, nothing personal!) builders plate.
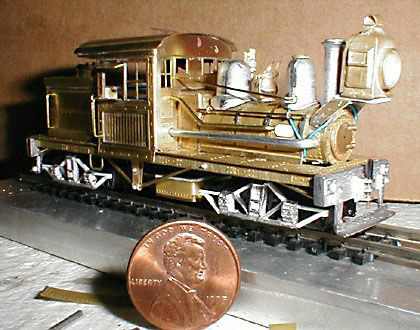
I discovered the best way to mount the N scale coupler in the rear. I used a MicroTrains coupler of the type used to replace N scale diesel truck mounted couplers. I cut off the "ears" on the end of the shank, and drilled a hole big enough for the brass rod used for the link coupler. The MT coupler was epoxied below the link and pin bracket, with the pin going through it for added strength.
Not shown is the sheet lead added inside the loco body to increase pulling power and improve slow-speed operation.
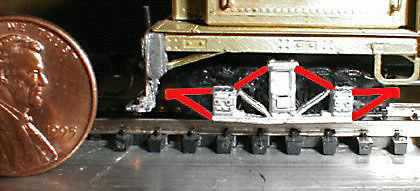
The picture above shows how I made trucks resembling those on a Dunkirk. Start with two Keystone Locomotive Works logging junk kits, which includes two smaller Shay sideframes per kit (total 4). These are cut away until you have something resembling the sideframe above, without the red, The pieces marked in red are styrene strips bent as appropriate and glued onto the sideframe. When done these are epoxied to the Life-Like diesel sideframes, which have been smoothed by sanding the details flat. A small square of styrene is glued over a hole in the center of the Shay sideframe.
To see some information on real Dunkirks, look here.